 Studying chair conformations is likely one of the trickiest visual topics in organic chemistry, perhaps second only to Fischer projections. Not only are you required to learn a 3-dimensional concept, but you also have to manipulate that 3-D molecule on 2-dimensional paper.
The average orgo student is not an artist, making this topic even trickier. In this article I'll show you a few quick and simple tricks to help you easily draw the standard hexagon, chair conformations and ring flips for cyclohexane.
When it comes to exams, you won't be graded on how ‘pretty' your chair looks. Instead your professor will look for clarity and the ability to distinguish your axial and equatorial substituents.
Drawing the Cyclohexane Hexagon
If there's one thing you learn in organic chemistry – it's how to draw a hexagon. Many students try to draw the entire thing at once, but the poor hexagon tends to look drunk and wobbly.
In fact, if you're starting to feel like the class is one big art lesson, read here: Organic Chemistry or Art Class?
Here's my approach:
- Draw 2 parallel lines
- Place a dot above the upper opening and another below the lower opening
- Connect the dots
Pretty? Not especially
But clear? Absolutely!
And that's what really matters.
As you get better you can combine steps 2 and 3 by simply visualizing the location of the dots.
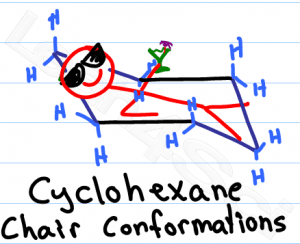
Drawing the Cyclohexane Chair Conformation
 This is where the messiness and confusion arises. Most books will show a chair conformation slightly sideways, making it impossible to copy. Worse, it's really difficult to show which substituents are axial vs equatorial.
‘Bowties' as I like to call them, are ok for the computer generated chair conformation. Here is my simple version which my tutoring clients use on exams with great success.
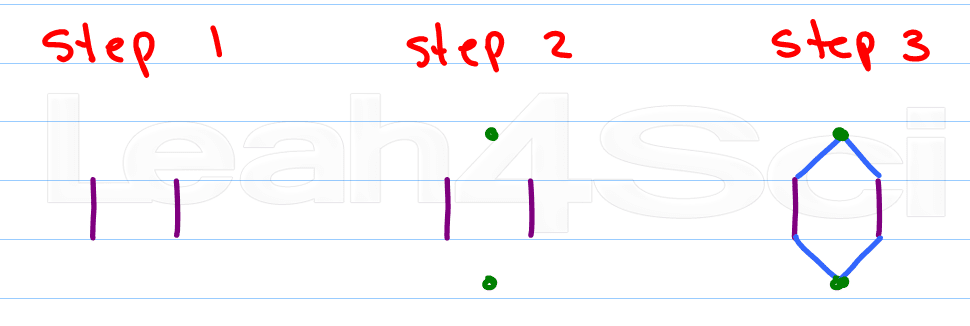
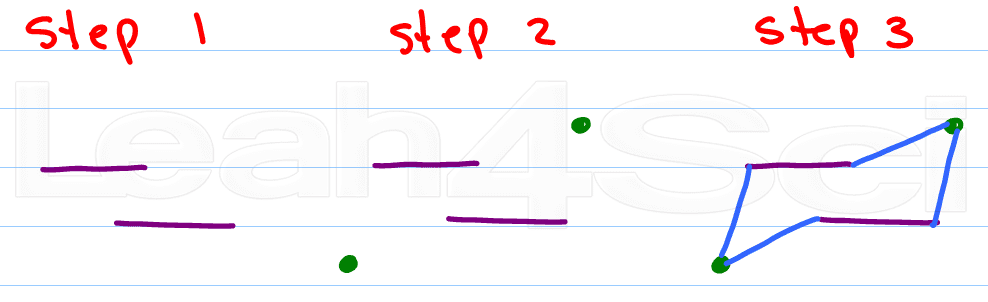
Step 1:
Draw 2 parallel lines slightly offset from each other. Top left or top right will give you alternate chairs.
Step 2:
Place a dot above the upper opening, and another below the lower opening
Step 3:
Connect the dots
Kinda sounds like the directions for drawing a cyclohexane, doesn't it?
But the chair confirmation doesn't stop here. It's important to understand how to position your substituents. And even more important to show what is axial and what is equatorial.
So let's move on:
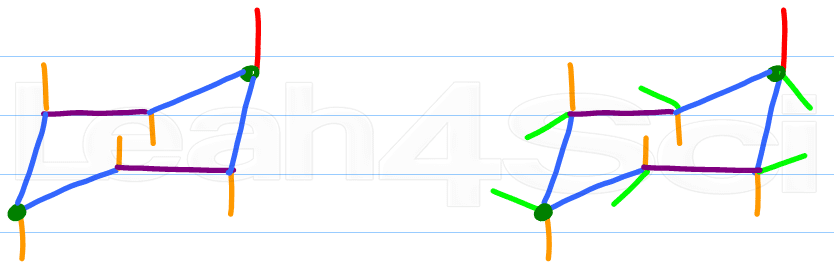
Step 4:
Identify the ‘up tip' OR ‘down tip' of your chair conformation, and draw a straight line up (up tip) or down (down tip) parallel to the y-plane. This is your first axial substituent.
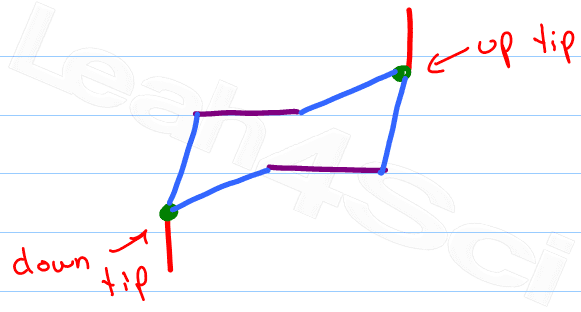
The chair conformation has alternating axial up, axial down… so once you have that single axial substituent move on to..
Step 5:
Alternate your axial substituents up and down all the way around your cyclohexane
Every carbon on the chair conformation has 1 substituent axial and the other equatorial. If axial is up equatorial is down, if equatorial is up then axial is down.
Step 6:
Pick any ONE carbon and locate its axial substituent. Draw the equatorial substituent up or down, the reverse of the axial substituent. But unlike the axial line, this one will start on the carbon and form a slight angle outward of the chair drawing. Do NOT draw these straight in the x or y plane.
Adding substituents to your chair
This is my favorite part. I find students get so confused when they try to match the cyclohexane to the drawing.
I don't!
All I care about matching are the numbers.
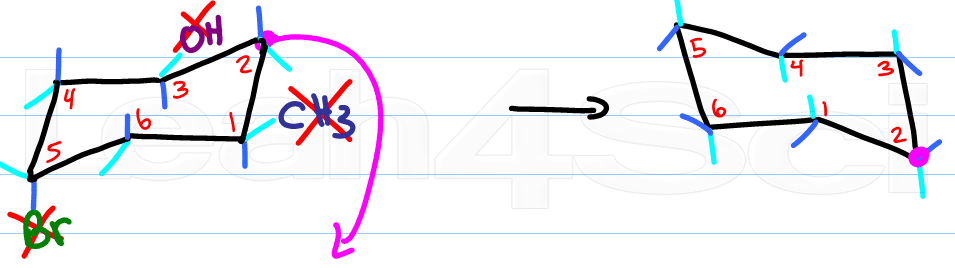
Start with a blank chair conformation. Number the carbons in your cyclohexane and in your chair.
Clockwise or counterclockwise doesn't matter, as long as you use the same direction for both molecules.
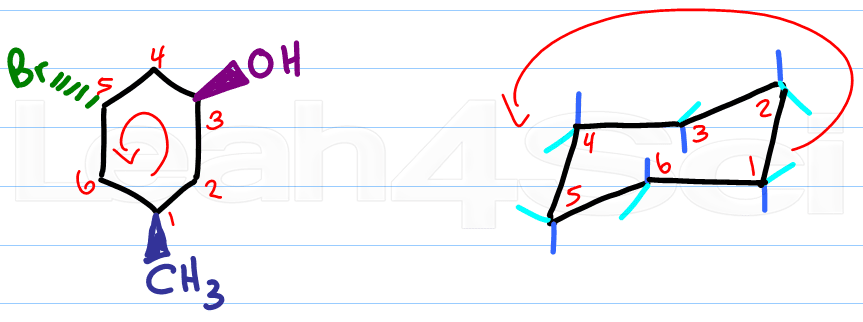
Then simply compare.
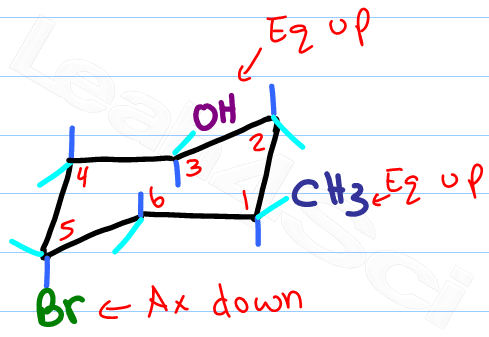
Identify the carbon number for the first substituent, if it's wedged add it to the up position.
If the substituent is dashed, add it to the down substituent (dashes down)
In using this trick you simply match the numbers and let your molecule quickly fall into place
Drawing a Ring Flip
The logic and reasoning behind the chair conformation ring flip will be discussed in my upcoming chair conformations video series. (stay tuned) However, drawing the ring flip doesn't have to be as hard as students think.
Yes the flip happens when one molecule changes its conformation to another, but the key to drawing the flip successfully is to… Ignore the first chair!
Counter-intuitive, I know, but trust me this method works.
Once you have your first chair, determine if your parallel lines have upper right or upper left.
Draw another chair using the steps described above, but change the direction of your top line.
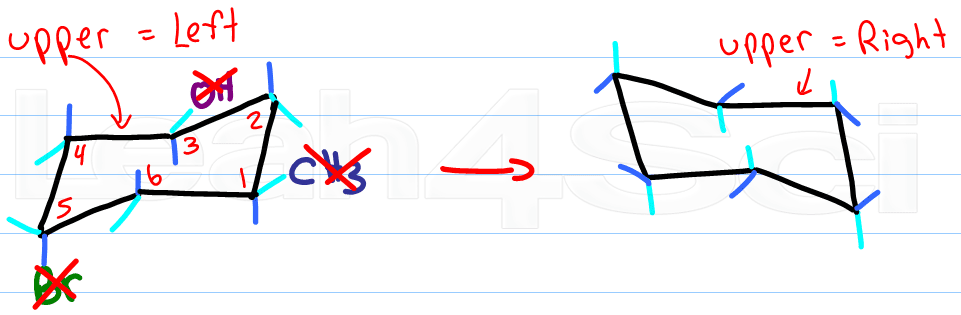
If your first chair has the upper line on the right, draw the second chair with the upper line left.
Ignore your first chair as you follow the rules for drawing and adding substituents.
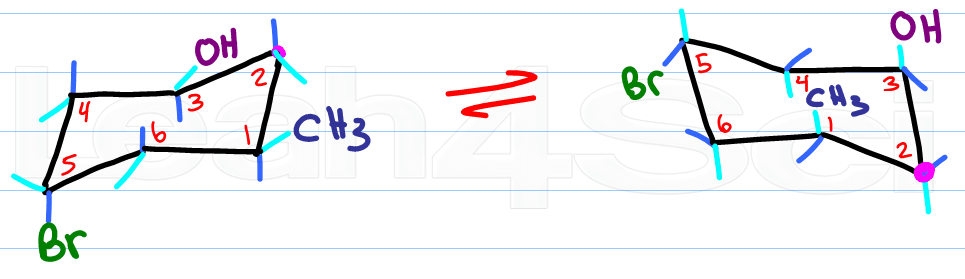
Now for the fun part, determine the new location for the up-tip carbon by ‘pulling down' your ‘up-tip' or raising up your ‘down-tip' Number your new chair, and play ‘match the numbers'.
If there's a substituent up on carbon #1, it says up on carbon #1. If it's down it stays down.
The only thing that changes with your ring flip is the location of axial and equatorial.
Remember this:
Up stays up, down stays down
Axial becomes equatorial and equatorial becomes axial
Hopefully you've been drawing chairs as you read this article. What do you think? does the idea of drawing chair conformations and ring flips still sound as scary as it used to? Let me know by leaving a comment below
Watch the video below for a complete demonstration of what we learned above.
Ready to tackle some chair conformations? Learn about their structure, stability, flips and more in the Cyclohexane Chair Conformations Tutorial Video Series.
Would a Model Kit help you? Watch How to Use Your Organic Chemistry Model Kit.


Hello! First of all, thank you so much for all these explanations and tips, it’s really helpful and motivating! However I still don’t get how we decide to put our equatorial substituents… Perhaps I’m stupid but I really don’t get it.
I struggled with drawing cyclohexanes with adding substituents for so long and this taught me in less than 5 minutes. Thank you so much!!
Thanks a lot. You make me more understand about chair conformation. I’m thank you sooooooo muchhhh!
Thanks so much for this explanation! it helped me a lot!!
When I learned chair structures when you do the flip and you “pull down” #2 the others flip up, so starting at #2 in the bottom right the one to the left would be #3 and the one in the bottom left corner would be #4. Same idea for the top numbers
This summary Rocks. Thanks!
much understandable explaination madam
You’re a good teacher. Thank you very much. Its clearer now.
Extremely helpful , i now have a clarity on chair conformations . ThankQ
I found this to be very helpful! The one thing I got a little confused on was why you chose to put the #1 carbon on the lower right corner of the chair and then when you flipped it you put #1 in the middle. I understand that up stays up and down stays down but does it matter where you number the new chair?
Thank you so much
i cant even express how much you helped me out
love from India
Hi. Now i m still confuse after reading all this though it was quit a helpful. Why we use the CH3 group to assign its carbon #1? why don’t assign the #1 to any other carbon? is it necessary to assign it or we can assign #1 to any of the carbon?
There’s no video? :-/
That was by far the best explanation for the chair conformation that I have come across….thanks a lot …it really helped.
Thank u. Itproved to be a great help.
this was really helpful! like the diagrams and labeling of everything. thanks!!
Easiest way
Wow this was so helpful and informative. I wish I had this tutorial the first time I took this class.
Thank you very much
You really have simplified a thing that I never understood in classroom
How to show GI in two hexagon attached together
I benefited a lot mam thnx so much u r the best
Very very helpful!! Thank you so much for doing this!
I don’t usually leave comments, but this was the best and most thorough explanation of drawing chair conformations I have ever come across! Thank you, this was so very helpful! 🙂
Hi I have a quick question, when doing a ring flip, how do you know which way to number the ring? I know you move it over one position, but does it matter if you go number #1 clockwise or counterclockwise? I understand that #1-6 have to go the same direction as the first chair conformation, but I can’t figure out how to start off the ring flip numbering. Thank you!
thank you so much
wow, my fear of drawing these crazy flip rings
went away, thank you
Great post! Thank you.
Helping me through my first semester of college Organic Chem! Thank you so much!!
Oh my god…. Thanks lot……
Thank you for such clear and simple instructions!!
Thank you mam
I am struggling to draw/identify cis and trans isomers in disubstituted cyclohane as chair confirmation, plz help
It was awesom specially that substituent part I was so confused thank u so much ……rocking…. Yeah
My prof showed your cyclohexane chair conformation video in our lecture and it was really helpful for everyone. Thank you very much!!!!
It was very valuable.. Thanks alot..
You are the best!
bundle of thanks for sharing these valuable informnation
this is very helpful, thank you.
You’re welcome!!
you are great great great i have become your fan(would love to receive an autograph) thanks mam and love u so much for this
Really helpful ma’am !!! Thank you!!
You’re welcome, Sashen!
thank you so much .. now I can say that I understand chair conformations <3
Great to hear!!
Thank you so much! Do you have a video for this yet?
Mam you are just awesome it helped me a lot thank u very much I love you mam..
Glad to help!
not sure if anyone posted this already (didn’t read through all the comments), but your equatorial markings on a few of the chairs on the ‘middle’ interior carbons are directed in the wrong way…
for example, on the very last flipped configurational drawing, carbon #1 & #4 equatorial lines should be leaning to the opposite direction.
If you’re referring to the ones going straight forward or back then it actually doesn’t matter. In truth we’re trying to draw it exactly forward or back. But that wouldn’t show on paper, so we offset slightly to one side or the other. Similar to drawing a Newman Projection in eclipsed conformation. It’s directly behind but we offset to one side making it visible on paper
my professor would mark that wrong LOL
I am sorry, but the equatorial substutuents mentioned here do not go straight forward or back. They go behind and forward in one particular oblique orientation, which maintains the tetrahedral geometry of the carbon(s) in question. A model will illustrate this beautifully. The adjacent equatorial bonds form a perfect ‘M’ or ‘W’ shape between themselves. So Julia was spot on in what she said.
wow superb…thankyou.
You’re welcome Devni
Thanks so much, this is so helpful! I’m still having a little trouble determining which chair confirmation should be lower energy, do you have any tips on that?
Cameron: Compare substituents and make sure the higher energy or bulkier subs are equatorial
Which ever conformation has more equatorial bonds has lower energy, and therefore is more stable. And vice versa for more axial bonds.
i want to ask fischer projection for (R)-1-bromo-1-chlorobutane. may you help me
See my Fischer Projection series: leah4sci.com/fischer
Sir you are awesome.
Harneet: I assure you, I am not a Sir
Thanks a lot ma’am. This was one of the confusing things in organic chemistry, but now it’s clear as crystal. 😛 You’re great ma’am.
You’re welcome, Swarnavo! I’m happy to hear that!
U r awesome! 😀
Thanks Akshaya
if my numbers were moving clockwise opposed to counterclockwise when i do the chair flip would my numbers all move one to the right instead?
Sarah: You can flip in any direction, but make sure clockwise remains clockwise and counterclockwise remains counterclockwise
Thank you thank you thank you!!!!
You’re very welcome Katherine
THANK YOU SO MUCH! this is the most helpful explanation of a ring flip!
You are very welcome JJ. Glad to help
You just saved my organic chemistry grade.
Glad to help Deniz
I’m a little confused about the numbering. For the upper left chair do you always number the carbon in the bottom right corner 1? Does it matter which carbon is carbon 1 as long as you keep things consistent when you do the ring flip?
Doesn’t matter where you start since it’s a ring. The key is to remain consistent with clockwise and counterclockwise numbering
you are amazing!!! actual life saver thank youuuuu!
Thank you Mia 🙂
Glad to help
I’m really sorry but I’m having trouble understanding why the numbers were moved on the last step…all the numbers in the cyclohexane seemed to move clockwise?
In a ring flip the corner carbon is pulled down and the entire numbering system shifts. But as long as you keep your sequence clockwise or counterclockwise (keep the same as the pre-flip chair) you’ll be ok
Thank you so much Leah! 🙂 this certainly cleared all my doubts! 🙂
You’re welcome
do you have a tutorial on how to draw cis and trans confirmations?
Not at this time though I do cover it in my membership site at https://leah4sci.com/join
Can you write chemical names
Chemical names for??
This is amazinggg and so helpful! Thank you so much!
You are very welcome
Thank you thank you thank you! So helpful!
You are very welcome Hannah
does it matter how you number the cyclohexane before I draw it in the chair conformation
It doesn’t matter Laz, so long as your consistent with your numbering in terms of clockwise or counterclockwise.
YOU TRICKS APPEAR EASY, CLEAR AND LESS CONFUSING.
Thank you Banda. So glad I can help. Drawing chairs should be fun not tricky
Why on the ring flip, you started putting your “1” in a different position?
Good question Jennifer. When you ring flip you have to pull the top carbon down. This moves every carbon over 1 position. So if the top carbon was 2, in the ring flip the bottom carbon will be 2. That means carbon 1 moved 1 position to the left in the drawing. Try this with your model kit and give every number a different color substituent
Thanks for your help! I now understand chair conformations! 😀
Thanks Jennifer – so glad I can help clarify this tricky topic