 Below is the written transcript of my YouTube tutorial video Converting Sawhorse to Fischer Projections.
If you prefer to watch it, see Video HERE, or catch the entire Fischer Projections Tutorial Series.
(click here to see the video on YouTube)
[Start of Transcript]
Leah here from leah4sci.com/MCAT and in this video we'll look at how to convert between a sawhorse to a Fischer Projections and then from a Fischer Projections back to a sawhorse. In the last video we introduced Fischer Projection so if you missed that make sure you go back and review because that is critical to understanding what's going on here. If you missed it, you can find my entire series on Fischer Projections alongwith the practice quiz and cheat sheet by visiting my website, leah4sci.com/Fischer.
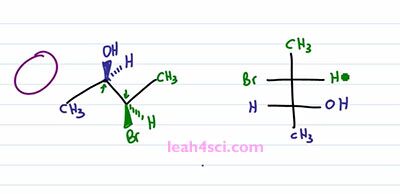
Recall that a Fischer Projection is a two dimensional way of representing a three-dimensional molecule with one or more chiral centers. And a sawhorse projection or a bond line notation, perspective formulation, you can call it many different ways, it's pretty much a zigzag drawing that shows the sp3 hybridized carbons in plane of the page with substituents coming out of the page or going into the page showing you the three-dimensional molecule and also the chirality if it exist. So how do you convert your three dimensional structure to a two-dimensional structure and still maintain chirality? Let's find out by looking at the molecule 2R 3R, 3-Bromo 2-Butanol.
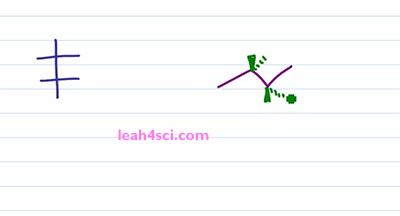
Let's prove it real quick, one, two, three, hydrogen four is in the back, that gives us R, one, two, three, hydrogen four in the back, ones again we have R. This is important because we have to maintain the 2R 3R when we look at the Fischer Projection. So let's take a look at the conversion. I'll start with the long and tedious process which shows you step by step and then I”ll show you the shortcut which will make it much easier and much faster because let's face it, you don't have time for tedious process on your exam. The first and critical step is the rotation. Because you want your sawhorse to represent the Fischer in a sideways view. Recall that a Fischer Projection has horizontal lines representing substituents that are coming out of the page, and if we have more than one chiral center that means we have more than one setup substituents facing in the same direction. In this case, both sets of substituents are coming forward and out of the page but in the three-dimensional molecule, we have one set going up compared to the molecule. But in the molecule on the left we have the blue set going up and the green set going down facing in opposite directions. So the first thing we want to do is rotate a hundred and eighty degrees between the blue and green chiral carbons so that the substituents are facing in the same direction. But before we do the rotation, let's quickly review some logic. If a circle is 360 degrees, a 180 degrees is exactly opposite from where you started. So if I have something in the plane of the page and it's facing up, a hundred and eighty degrees puts it down but still on the plane of the page. If something is up it'll go down, if it's down it'll go up. And if something is coming out of the page rotating a hundred and eighty puts it into the page and if it's into the page rotating one eighty puts it out of the page.
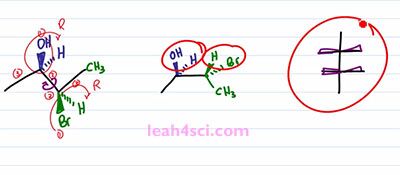
So to start this rotation, we'll keep the blue ended molecule as it is. That means the OH is still out of the page, the Hydrogen is still into the page. And then we have the bond between the blue and the green carbons and then the green one is the one that'll show that rotation. We have a CH3 up in the plane of the page which puts it down but still in the plane of the page. We have a Bromine down but out of the page so we rotate it to face up but now it goes into the page. We have Hydrogen going down but into the page so when we rotate it ,it's going to be up and out of the page. And now if you'll look at the molecule, you'll notice that we have the line between the two carbons, the two groups on the end facing in the same direction just like with the Fischer Projection facing into the page. And then we have the two sets of substituents pointing in the same direction upward. Yes one is in and one is out of the page but the point is they're facing upward. And if we look at this Fischer Projection and imagine that we're looking at it from the top, the wedges coming out are the groups that are facing upward. And if you can see that correlation, it's going to be very easy to take your substituents and put it on to the Fischer Projection. But the most important thing you want to recognize is what happened to the substituents when you rotated the molecule. Notice that in the starting molecule, the OH is out of the page and so is the Bromine. They're on the same face of the molecule, but one is on the carbon that's upward and one is on a carbon that's downward. When we do the rotation and the groups are now together, notice that the OH and the Bromine are no longer on the same phase. The OH is still up and out of the page but the Bromine, now that it's up is into the page and that will be the critical step in recognizing how to setup a Fischer Projection.
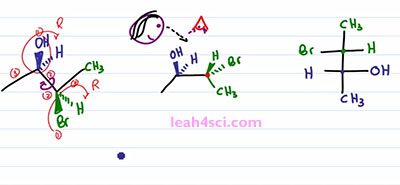
The next step is a little tricky so take your time and if doesn't make sense right way, rewind the video and watch it again. You want to place your “eye” at the very top of the molecule so that you're looking down. So we have pupil, some eyelashes and you're looking down on this molecule. When you're looking down, the substituents that are facing up are coming at you, it doesn't matter if they're in or out of the page, the fact is if you're looking down, anything pointing up is coming at you just like a Fischer Projection. You can choose to have Carbon 2 or Carbon 3 in the upper carbon on your Fischer Projection. It doesn't matter, but I'm going to choose this carbon, the green one to be the upper and the blue carbon to be the lower. We'll start with the Methyl group. Since I'm looking at this from the top, the Methyl group are as far away from my eye as can be, which means on a Fischer Projection they have to represent the groups facing down and away from my eye so we have a green Methyl on top and a blue Methyl on bottom.
For the next step it will actually help if you physically take your face and move it to the side of the screen so that you're looking at it from this direction. So that here's your eye, here's your mouth, and you're looking at it that way. Notice that Bromine is towards the upper part of your face and OH is towards the lower part of your face, that helps justify why I put the green carbon on top and the blue one on the bottom. But now I want you to think at how the substituents are lined up. If you're face is in-between the right and the left, meaning your eyes are in-between the substituents coming out of the page and going into the page, then the substituents that are coming out of the page are lined up with your right eye and the substituents going into the page are lined up with your left eye. That means from this perspective, whatever is out of the page goes towards the right of the molecule, which means I have a green Hydrogen and a blue OH on the right side. And whatever is going into the page is on the left of the molecule, which gives me a green Bromine and blue Hydrogen on the left, and that's my Fischer Projection.
I realize this was tricky, so if you don't fully get it, go back, watch it again. If it helps, take out a model kit and build it and follow along on a kit but I wanna make sure you get it one hundred percent before you move on to the trick because the trick is tricky but if you get what we just did it will definitely save you time on your exam.
We'll start with the same molecule and instead of doing rotation, we're going to jump right into the Fischer Projection. I prefer to look at the molecule from the left side so that the blue carbon is going to be the lower carbon and since that has the substituents coming up, not into out of the page, just physically up so that these are in the upper half of the molecule, that's what I'm going to use so that the OH out of the page is on the right, the Hydrogen into the page is on the left. We have a Methyl group so we put that on the bottom. For the green carbon, we're simply going to understand that when you do a rotation, substituents that start out on the same side, wind up on opposite sides and that's what we are going to do here. The Methyl group is still going to be in the plane but it goes down so automatically put that on the top. And then with the Bromine and Hydrogen, recognize that when the Carbons are pointing one up and one down, if Bromine is on the same side as the OH then when we rotate it it'll be on the opposite side so all I do is put the Bromine opposite and the Hydrogen on the same side. It's exactly the same process as with the rotation, but instead of going through the process of drawing the rotation we understand where it's coming from. Understand what changes and then simply draw it out.
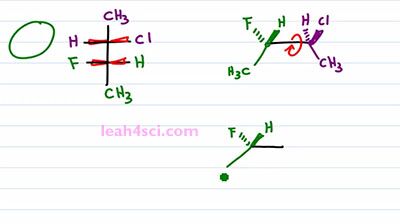
Now what happens if you're given a Fischer Projection and asked to draw it as a Sawhorse or asked to recognize the molecule on your multiple choice exam? Here we have another molecule with the two chiral carbons in different colors so that we can tell them apart. The first thing you want to do is recognize that these are coming up and out of the page and that means I can simply take these two carbons and draw them out. There are two ways that we can do this, I'll start with the long way and then show you the shortcut. The long way is by drawing exactly what you see. So it's longer but it's easier and this is the best way to learn this by practicing this way first. If I imagine that the purple carbon is on the right, and the green one is on the left. And also imagine that I'm staring at this straight down so my face is on top of this molecule and I'm looking straight down. So that the Chlorine and the Hydrogen are on the right side but if I tilt my face slightly, so that I'm looking from this angle not only is it to the right but it's also slightly up. That means that I'll put the Chlorine up and out of the page and the Hydrogen going into the page. Same thing with the green carbon but this time I have a Hydrogen up and out of the page and a Fluorine going into the page. Both carbons have a CH3 going down in the plane of the page. And this gives me a Sis type configuration because the groups are next to each other. But a three-dimensional molecule tends to be more stable when we rotate it a hundred eighty degrees so that the groups are opposite from each other in a zigzag formation. So the last thing we wanna do is rotate a hundred eighty degrees between the green and the purple carbon, the blue. We'll keep the green carbon as it is with the Hydrogen forward and the Fluorine back and the Methyl in the plane of the page going down. For the purple carbon, the Methyl down in the plane of the page is a Methyl up. A Chlorine up and out of the page becomes a Chlorine down and into the page. And a Hydrogen up into the page becomes a Hydrogen down and out of the page. And that's our molecule the long way.
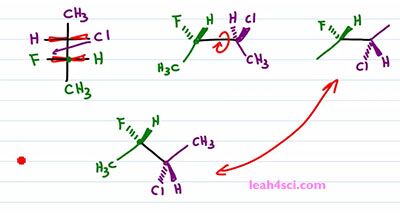
Now let's do the same thing and find the molecule using the faster way. I like to draw the carbon on the left slightly up, the carbon on the right slightly down. I'll put the green on the left and the purple on the right. Once more I'm looking at it from the top, down but I'm putting my face to the left side of the screen so that anything on the side of my right eye is coming up and out of the screen. But we'll only do that for the green carbon. With the green carbon we have a Methyl, down and in the plane of the page.The Hydrogen is on the right side so it's coming forward and the Fluorine is on the left side so it's coming back into the page. Chlorine would have been on the right. But recognize that, a rotation has to happen. What I'm going to do is simply swap the positions. So Chlorine starts out on the same side of the Hydrogen but after that one eighty rotation I'll put it on the same side of Fluorine. And since Fluorine goes down and into the page, that rotation putting Chlorine on the lower half of the molecule, meaning facing down puts it down and into the page. And the Hydrogen which would have gone down into the page if facing up is now coming up and out of the page if it's facing down. And let's not forget that Methyl in the plane of the page going up. Notice that we did the same exact thing. This method took a little more thinking but ultimately saves us a step. Now this is critical when you don't actually have to draw them in exams because you can quickly recognize what should stay together and what should switch positions without actually having to draw it.
Be sure to join me in the next video where we look at how to convert from Newman Projection to Fischer Projection and then back from Fischer to Newman. You can find my entire series on Fischer Projection along with the practice quiz and cheat sheet by visiting my website leah4sci.com/Fischer.
[End of Transcript]
Click HERE to Catch my entire video series on Fischer Projections.


